
OPERATING INSTRUCTIONS
LEHLE DUAL EXPRESSION
LEHLE DUAL EXPRESSION#
Dear Musician!
Thank you for purchasing your LEHLE DUAL EXPRESSION!
I have been building units that switch, split and route signals with no technical compromises and with maximum musical fidelity since 1999. Your new LEHLE DUAL EXPRESSION comprises only the very best components. Every assembly of your LEHLE DUAL EXPRESSION has been made and tested in Germany.
Your LEHLE DUAL EXPRESSION is of extremely robust design and construction, to make sure that you get absolutely years and years of enjoyment from it. If you should nonetheless have a problem, or simply a question, just mail me or a member of the Lehle team at: support@lehle.com
I wish you the very greatest pleasure and success using your LEHLE DUAL EXPRESSION!

How an expression pedal works#
An expression pedal usually controls a specific value of an effects device.
For example you want to use your foot to control the mix amount of your delay pedal. In most cases your effects pedal offers a control / potentiometer that cares about the mix amount of your delay pedal. This potentiometer will now be replaced by an external expression pedal, that also usually works with a potentiometer.
The procedures, how this is being done, are as complicated as they are varied. Typically, your effects pedals send a voltage of 3.3 V or 5 V to the potentiometer of the expression pedal. The potentiometer as a variable resistor routes a part of the voltage back. The sent back voltage – also called control voltage – is being changed by the position of the potentiometer. The effects pedal measures the control voltage and thus can modify a parameter. In the above-mentioned example the mix amount would be changed.
Instead of stereo jacks or mono jacks we are talking rightly about TRS and TS jacks.
The individual cables and polarities in summary:
RTS: the control voltage is being applied to the ring of the TRS jack.
TRS: the control voltage is being applied to the tip of the TRS jack.
TS: here the effects pedal measure the voltage between sleeve and tip of the TS jack.
General Description#


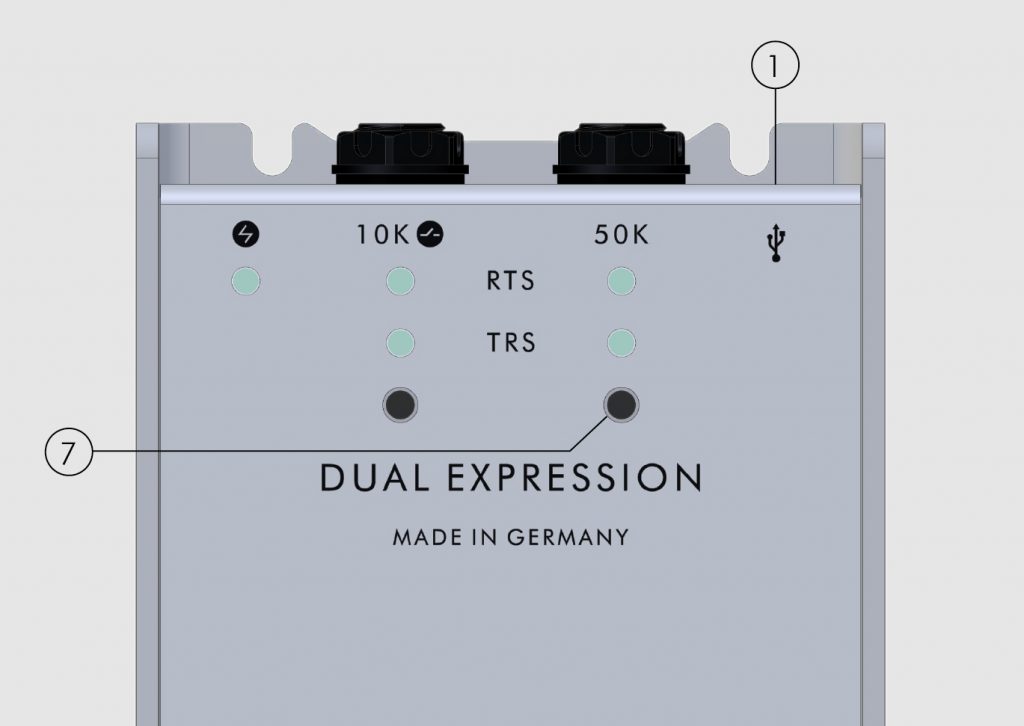
1. USB-SOCKET
Via the USB socket you can calibrate, edit and update the LEHLE DUAL EXPRESSION via the free online editor LEHLE VERWALTER – and by the way it sends MIDI data to a computer, in order to control midi compatible software or any hardware device offering a USB host.
If you want to use your LEHLE DUAL EXPRESSION as MIDI-USB pedal, e.g. to send MIDI parameters to your DAW, your amp simulation software or software synthesizer, please follow the instructions in chapter “LEHLE DUAL EXPRESSION AS MIDI-USB EXPRESSION PEDAL”.

2. 50K-SOCKET
Connect your effects pedal or keyboard with a jack cable to this socket.
The 50K socket controls your effects pedal or keyboard that works with expression pedals within a range of 25kΩ to 100kΩ.
The 50K socket has 3 different socket-modes:
Polarity Autodetection, TRS and RTS.
By pressing the soft button (7) the socket-mode will be changed:
SOCKET-MODES:
- Polarity Autodetection: Both LEDs are white, as long as no jack is plugged in.
Once you connect a jack to the socket, the LEHLE DUAL EXPRESSION measures the polarity (RTS, TRS or TS) and adapts to the polarity automatically. During the measuring process both white LEDs are flashing alternately. After the measuring process only one LED is on, according to the matching polarity. The pedal stores the selected mode, as long as a jack is connected to the socket. - TRS: Only the TRS LED is on.
The control voltage is tapped at the tip of the TRS jack. - RTS: Only the RTS LED is on.
The control voltage is tapped at the ring of the TRS jack. This mode works for TS with a TS jack, too.
It’s best to try the Polarity Autodetection first. Ensure that both LEDs of the 50K socket are on whilst there is no jack connected. Now connect the TRS or RTS/TS jack to the 50K socket. After the LEDs stopped flashing and only one is on, your effects pedal or keyboard can receive expression data.
Move the rocker of the LEHLE DUAL EXPRESSION. If your effects pedal doesn’t react properly, press the 50K button (7) to switch from Polarity Autodetection to TRS or RTS/TS. The alteration of the polarity causes tip (T) and ring (R) to be swapped. Thus you are flexible to act best on every effects pedal.
Refer to the manual of your effects pedal to find out, if you need a TS-TS cable (coll. monocable) or TRS-TRS cable (coll. stereo cable) to make a proper connection.

3. 10K-SOCKET
Connect your effects pedal or keyboard with a jack cable to this socket.
The 10K socket controls your effects pedal or keyboard that works with expression pedals within a range of 5kΩ to 20kΩ.
This socket can also be set to a latching or momentary switch and, e.g. switch the channel of your amplifier.
The 10K socket has 5 different socket-modes:
Polarity Autodetection, TRS, RTS, momentary switch and latching switch.
By pressing the soft button (6) the socket-mode will be changed:
SOCKET MODES:
- Polarity Autodetection: Both LEDs are white, as long as no jack is plugged in. Once you connect a jack to the socket, the LEHLE DUAL EXPRESSION measures the polarity (RTS, TRS or TS) and adopts to the polarity automatically. During the measuring process both white LEDs are flashing alternately. The pedal stores the selected mode, as long as a jack is connected to the socket.
- TRS: Only the TRS LED is on.
The control voltage is tapped at the tip of the TRS jack. - RTS: Only the RTS LED is on.
The control voltage is tapped at the ring of the TRS jack. - Momentary switch: The rear LED of the 10K socket flashes blue. A contact is made between tip and sleeve, once the rocker reaches a specific position. If the contact is made, the front LED is white.
- Latching switch: The rear LED of the 10K socket is consistently blue. A contact is made between tip and sleeve, once the rocker reaches a specific position. The contact stays closed until the rocker reaches the position again. If the contact is closed, the front LED is white.
If you use the 10K socket as an expression controller and not as a switch, it’s best to try the autodetection first.
Ensure that both LEDs of the 10K socket are on whilst there is no jack connected. Now connect the TRS, resp. TS jack to the 10K socket. After the LEDs stop flashing and only one is on, your effects pedal or keyboard can receive expression data.
Move the rocker of the LEHLE DUAL EXPRESSION. If your effects pedal doesn’t react properly, press the 10K button (6) to switch from Polarity Autodetection to TRS or RTS, resp. TS. The alteration of the polarity causes tip (T) and ring (R) to be swapped. Thus you are flexible to act best on every effects pedal.
Refer to the manual of your effects pedal to find out, if you need a TS-TS cable (coll. mono cable) or TRS-TRS cable (coll. stereo cable) to make a proper connection.
If you are using the 10K socket as a latching or momentary switch, you are able to control a switch input of an effects pedal. In combination with a complex multi effects pedal it is possible, e.g. to simulate a Wah pedal which is being activated and deactivated when the relay is triggered by you.
Refer to the manual of your effects pedal to find out, if you need a TS-TS cable (coll. mono cable) or TRS-TRS cable (coll. stereo cable) to make a proper connection.
In factory setting the relay will be triggered in toe position in the last few millimetres.
Nevertheless, you can adjust in which position of the pedal range the relay shall be triggered. E.g. it’s possible to set the trigger point at heel position or somewhere in between the range.
The easiest way is to customise this via the LEHLE VERWALTER, the free online editor.
You will find out how to do this in the chapter “CALIBRATING THE PEDAL TRAVEL AND THE SWITCHING OUTPUT”.
Attention: The LEHLE DUAL EXPRESSION can work with voltages up to 10V.
Higher voltages will be blocked by diodes to protect the electronics of the pedal.
Please refer to the manual of your effects pedal to find out how much voltage your pedal provides.

4. EXTERNAL POWER SUPPLY
Connect a power supply with a voltage of 9 – 15 V.
In order that the LEHLE DUAL EXPRESSION can work flawlessly, it needs a current supply. This should supply a minimum of 9 V and a maximum of 15 V. Polarity is of no importance. The supply voltage is internally rectified and stabilized in order to guarantee trouble-free operation. In order to avoid noise it’s recommendable to use a single power supply or an output of a multi power supply offering galvanically isolated outputs for the LEHLE DUAL EXPRESSION.
If the LEHLE DUAL EXPRESSION is connected to a computer via a USB cable to use it as MIDI-USB expression pedal or to update the firmware, you don’t need an external power supply. However, for the standard operation with connected sockets (2 and 3) it’s better to use its own power supply.
5. LED OF THE POWER SOCKET
This LED shows that your pedal is active.
Congratulations: The white LED shows you that the LEHLE DUAL EXPRESSION has started correctly and is active.
If you move the rocker of the pedal, a blue LED instead of the white LED indicates that data is being sent via the sockets (2 and 3).

6. BUTTON FOR 10K SOCKET RTS/TRS
Here you can change the mode of the 10K socket.
Press this soft touch button to select if the 10K socket (3) should provide expression data (TRS/RTS/TS) or work as a latching switch or momentary switch.
In Factory setting the Polarity Autodetection is selected, to automatically switch between TRS, RTS or TS.
You will find out how to change the socket modes and what these are doing at point „3. 10K-SOCKET“.
7. BUTTON FOR 50K-SOCKET
Here you can change the mode of the 50K socket.
Press this soft touch button to select if the 50K socket (2) should provide TRS, RTS or TS expression data.
In Factory setting the Polarity Autodetection is selected to automatically switch between TRS, RTS or TS.
You will find out how to change the socket modes and what these are doing at point „50K-SOCKET“.
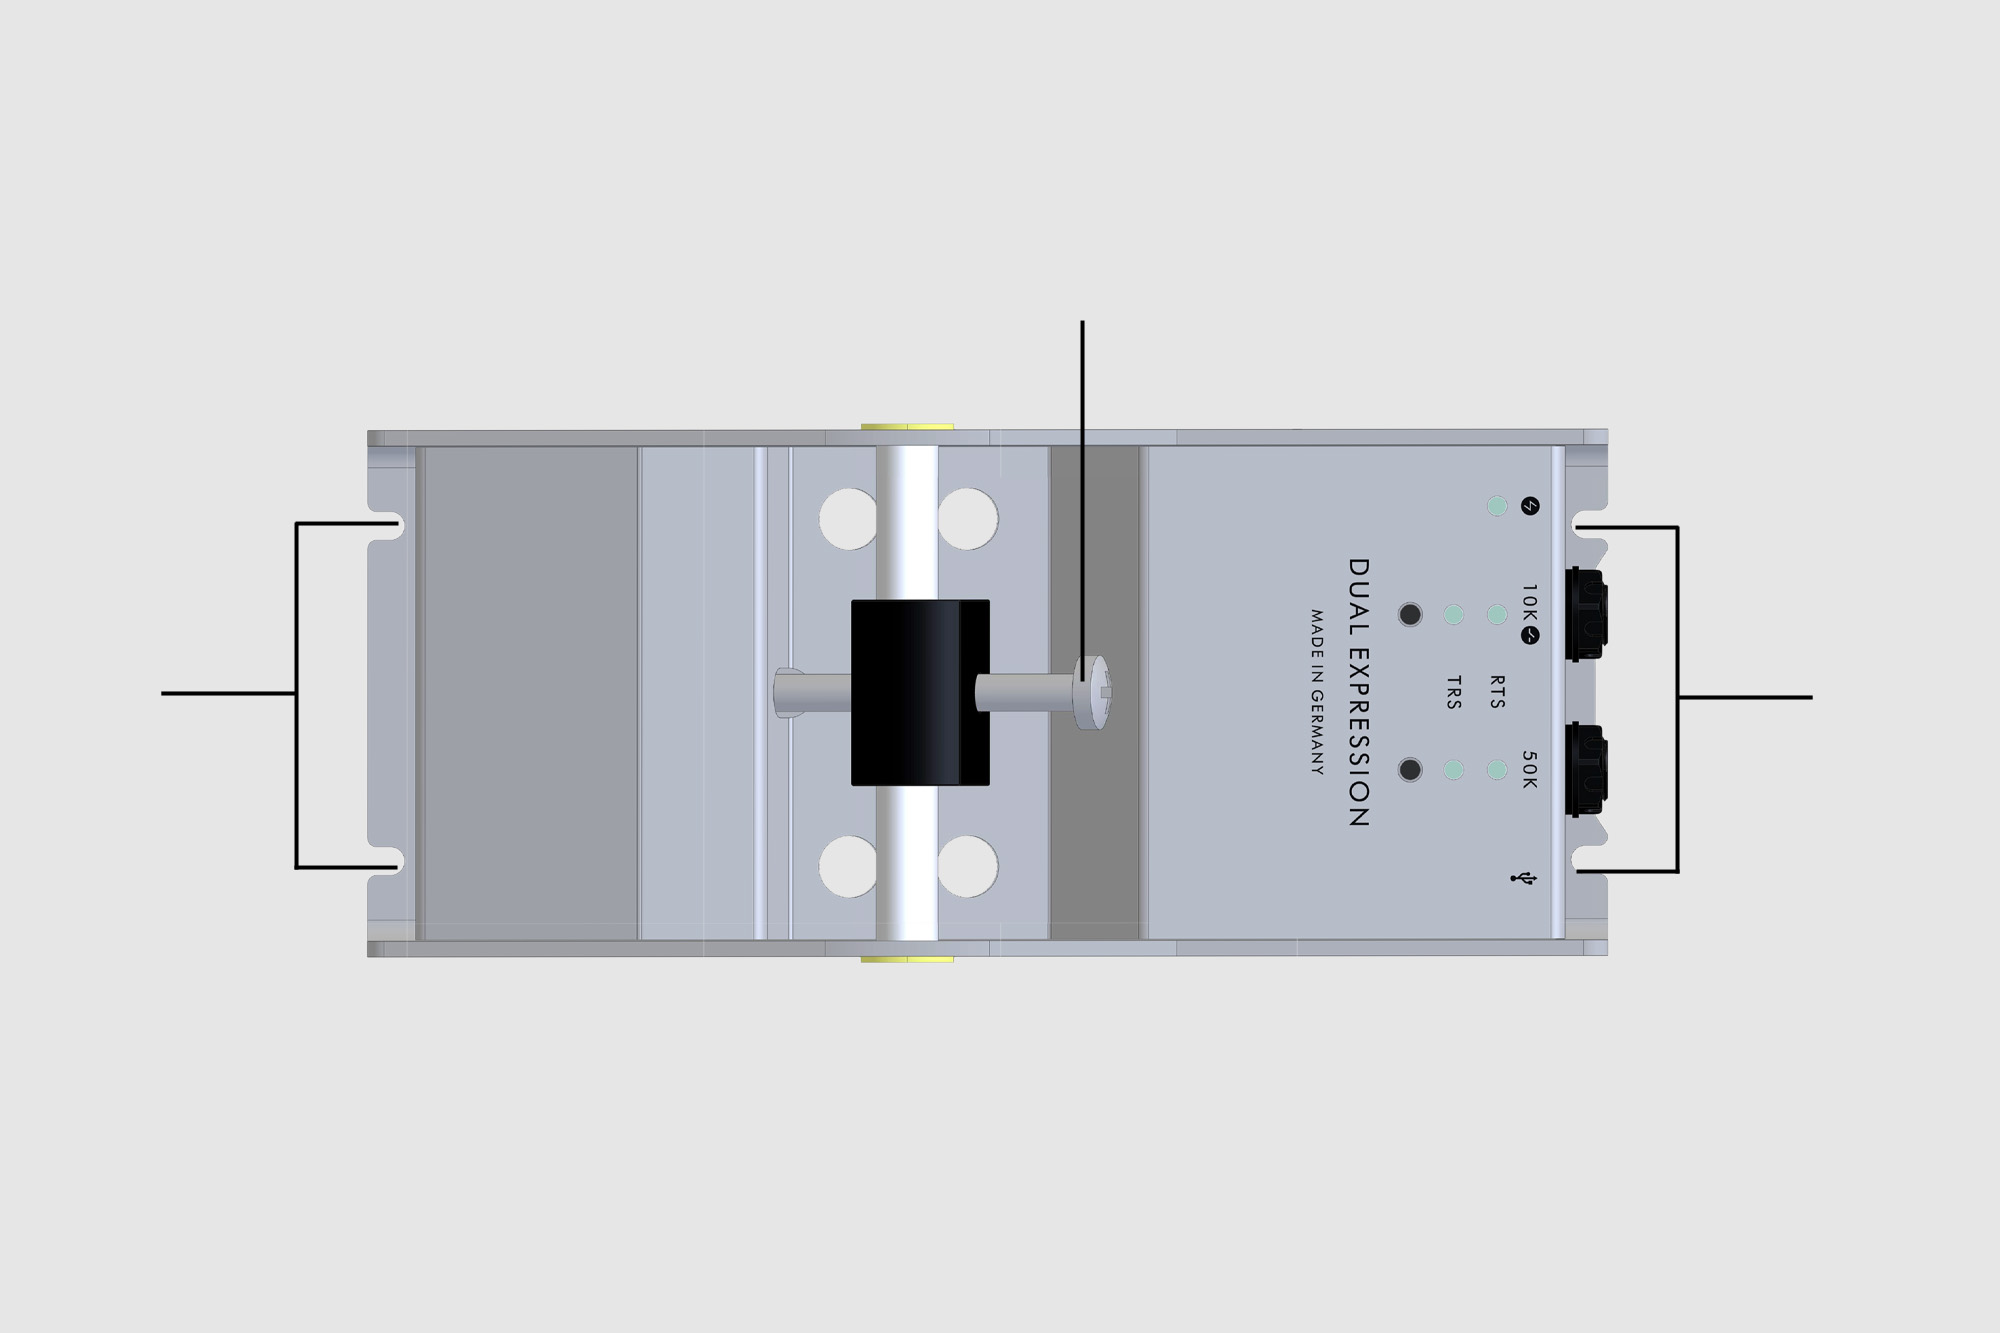
8. PEDAL FEEL
Turn this screw to adjust the feel of the pedal.
If you turn this screw clockwise, you tighten the brake. This way the pedal feel of the LEHLE DUAL EXPRESSION will be heavier. Turning the screw counterclockwise diminishes the resistance when pressing and gives the rocker a lighter feel.
You can find replacement feet, Screw- and 3M Dual Lock™ sets at www.lehle-components.com
9. BASE AND FIXING
If needed, you can mount the LEHLE DUAL EXPRESSION to a plate such as a pedalboard.
The LEHLE DUAL EXPRESSION can easily be mounted to a plate using the prepared fixing system of the pedal.
You need 4 screws (4.2×13) and 4 M4 washers.
First, we recommend that you pull out the rubber feet on the bottom.
Place the pedal without the rubber feet in the position where you want to attach it to the board. Use a fine-point pen or a sharp pencil to sketch the subsequent screw holes through the 4 mounting holes onto the base plate. Now drill at the site of the later screw holes a hole with a diameter of approximately 2.5 mm (1/10 inch).
Then turn in two of the four screws together with the washers just halfway.
Slowly slide the LEHLE DUAL EXPRESSION with the holes under the screw heads of the screws already screwed in. Make sure that the washers are placed between the bottom plate of the LEHLE DUAL EXPRESSION and the screw head to protect the paint.
Now you can turn in the remaining two screws and spacers through the other two mounting holes. Tighten those screws only slightly, then fix the screws you first turned in. This type of mounting is extremely stable and can also be easily removed.
For flexible solutions we recommend using 3M Dual Lock™ instead of velcro for stability.
If you are using the velcro / Dual Lock™ method, please make a note of the serial number from the bottom of the pedal before you cover it, in case you have a support question for us later and don‘t fancy dismantling your board!
Calibrating the pedal travel and the switching output#
In factory setting the pedal range of the LEHLE DUAL EXPRESSION is perfectly calibrated and the switch output of the 10K socket is being triggered in the last few millimetres.
However, you can easily adjust the pedal to your needs using the LEHLE VERWALTER, our free online editor.
Normally, it doesn’t need a calibration again.
1. Entering the calibration process menu
- To enter the calibration process menu, first disconnect the power supply connection. Press and hold the 10K soft touch button and reconnect the power supply connector.
- You can now release the soft touch button.
- The blue 10K switch LED and the white 50K TRS LED are flashing alternately.
2. Calibrating the pedal range
- In order to calibrate the pedal range, where the minimum (heel) and the maximum (toe) position of the pedal range should be reached, in the calibration process menu (1.) the 50K soft touch button needs to be pressed.
- The 50K TRS LED flashes.
- Move the rocker within 5 seconds (say “Lehle switcher” five times) to the most minimal heel position and then into the maximum toe position.
- The pedal learns these two positions and stores the values inside.
- After the 5 seconds the 50K TRS LED stops flashing, goes off and the calibration process is finished.
- The LEHLE DUAL EXPRESSION reboots again.
How long the pedal range shall be, is your decision. This can be all the way to the stop or shortly before, if you like a decreased pedal range. As in the factory setting, we recommend the use of the whole pedal range, since minimum and maximum values can often be set at the effects pedal itself.
3. Calibration of the relay switch output
The relay of the 10K socket is an electronic switch, which can perform a momentary or latching switch signal, e.g. to switch a channel at an amp or control a switch-input of a digital device.
You can set the position where the relay shall be triggered.
- In the calibration process menu (1.) the 10K soft touch button needs to pressed.
- The blue switch LED starts flashing.
- Move the rocker within 3 seconds (say “Lehle switcher” three times) to the position you want the relay to be triggered.
- The maximum position will be learned and stored inside.
- The calibration process is finished when the blue switch LED stops flashing and goes off.
- The LEHLE DUAL EXPRESSION reboots again.
A classic usage would be to move the rocker to the maximum toe position and then give it a little push with your toes. This way you can simulate the behaviour of a typical Wah pedal switch.
Manual Firmware Update#
In case the pedal can’t yet be updated with the free online editor LEHLE VERWALTER, you can still update it manually.
In order to update the pedal, you need a PC or Mac with a free USB slot, an USB cable and an internet connection.
The pedal doesn’t need any additional power supply.
Download the current firmware here.
The downloaded „.bin“ firmware file doesn‘t need to be extracted!
Now connect the USB cable to a free USB slot on your computer.
At the LEHLE DUAL EXPRESSION press and hold the 50k button and connect the other side of the USB cable to the USB socket of the LEHLE DUAL EXPRESSION.
Release the 50k button.
| WINDOWS | MacOS |
| 1. In the Windows Explorer open the re-movable disc „CRP DISABLD“. | 1. In the MacOs Finder open the removable disc „CRP DISABLD“. |
| 2. Delete the contained file “firmware” or “firmware.bin”. | 2. Delete the contained file “firmware” or “firmware.bin”. |
| 3. Locate the downloaded firmware; usually it’s in your downloads folder. | 3. Locate the downloaded firmware; usually it’s in your downloads folder. |
| 4. Drag the file or use the “copy & paste” context menu, to bring the new firmware to the removable disc. | 4. Drag the file to the removable disc. |
| 5. Disconnect the USB connection by removing the USB cable. | 5. Eject the removable disc (cmd + E) and disconnect the USB connection by removing the USB cable |
| The firmware has been updated. Now the pedal must be calibrated. | The firmware has been updated. Now the pedal must be calibrated. |
RESTORING THE FACTORY SETTING#
If you decide to restore all settings back to the factory setting, please proceed as follows:
- Disconnect the power supply connection.
- Press and hold the 10K soft touch button.
- Reconnect the power supply connection.
- The LED of the power socket (5) is flashing alternately white and blue.
- After approx. 3 seconds the LEDs go off and the LEHLE DUAL EXPRESSION reboots again.
Every setting and calibration made by you is reset.
Typical uses: LEHLE DUAL EXPRESSION#
as a classic expression pedal#

DEVICE CONNECTION
| EXP socket effects pedal | |
| EXP socket effects pedal |
Control of a specific parameter of your effects pedal is probably the most popular application.
If you are unsure how to set the parameter you wish to control, if you need a TRS or TS cable and if you should use the 10K or 50K socket, please refer to the manual of your effects pedal.
HOW TO DO THIS:
- At the LEHLE DUAL EXPRESSION the LEDs of RTS and TRS should be both on. This way the Polarity Autodetection is active.
- Connect the 50K or 10K socket to the expression input socket of your effects pedal.
- After the LEDs of RTS and TRS have started and stopped flashing, the LEHLE DUAL EXPRESSION has selected the correct polarity automatically and move the rocker of the LEHLE DUAL EXPRESSION.
- Move the rocker of the LEHLE DUAL EXPRESSION.
- There you go!
If your effects pedal doesn‘t react properly:
- Try the other output socket (2 or 3) of the LEHLE DUAL EXPRESSION.
- Depending on which output socket you are using (2 or 3), toggle the 10K button (6) or the 50K button (7) to change the polarity manually.
with a Kemper™ Profiler™ Head / Profiler™ Stage#

DEVICE CONNECTION
| KEMPER™ pedal input | |
| KEMPER™ pedal 2 / switch input |
By means of the additional 10K socket as a switching output, it’s very easy and flexible to control the KEMPER™ PROFILER™ devices. This way you can activate and deactivate, e.g. the Wah pedal or any other effects in the KEMPER™.
HOW TO DO THIS:
- At the LEHLE DUAL EXPRESSION the LEDs of RTS and TRS should be both on. This way the Polarity Autodetection is active. In order to use the switching function of the 10K socket, its function must be activated. Hit the 10K button (6), until the LED flashes blue, so the LEHLE DUAL EXPRESSION provides the momentary switch function when the rocker is in toe position.
- Connect the 50K socket with a TRS cable to the expression pedal input socket of your KEMPER™.
- After the LEDs of RTS and TRS now have started and stopped flashing, the LEHLE DUAL EXPRESSION has selected the correct polarity automatically.
- Connect the 10K socket with a TRS cable to the expression pedal 2 / switch input socket of your KEMPER™.
- Move the rocker of the LEHLE DUAL EXPRESSION.
- In the settings of your KEMPER™ you can select which parameter should be controlled.
- There you go!
WITH A MULTI EFFECTS PEDAL#

DEVICE CONNECTION
| Multi effects pedal input | |
| Multi-effect pedal 2 / Switch Input |
Some multi effects pedals have multiple control inputs for expression pedals. With the LEHLE DUAL EXPRESSION you can use two inputs and by means of the 10K socket trigger the switching function which can use your multi effects pedal on the other hand to, e.g. switch a preset, activating a Wah pedal or whatsoever your effects pedal makes possible.
HOW TO DO THIS:
- At the LEHLE DUAL EXPRESSION the LEDs of RTS and TRS should be both on. This way the Polarity Autodetection is active. In order to use the switching function of the 10K socket, its function must be activated. Hit the 10K button (6), until the LED flashes blue, so the LEHLE DUAL EXPRESSION provides the momentary switch function when the rocker is in toe position.
- Connect the 50K socket to the expression pedal input socket of your multi effects pedal.
- After the LEDs of RTS and TRS now have started and stopped flashing, the LEHLE DUAL EXPRESSION has selected the correct polarity automatically.
- Connect the 10K socket to the second expression pedal input socket of your multi effects pedal and move the rocker of the LEHLE DUAL EXPRESSION.
- In the settings of your multi effects pedal you can select which parameter and switching function should be controlled.
- There you go!
with an effect pedal and an amplifier#

DEVICE CONNECTION
| EXP socket effects pedal | |
| Amplifier footswitch input |
The 10K socket can be used as a momentary or latching switch. This way you can control external devices. Channels of amplifiers are usually switched by a footswitch. How about doing this with your LEHLE DUAL EXPRESSION and simultaneously controlling an effects pedal?
How to do this as a momentary switch:
- At the LEHLE DUAL EXPRESSION the LEDs of RTS and TRS should be both on. This way the Polarity Autodetection is active. In order to use the switching function of the 10K socket, its function must be activated. Hit the 10K button (6), until the LED flashes blue.
- Connect the 50K socket to the expression pedal input socket of your multi effects pedal.
- After the LEDs of RTS and TRS now have started and stopped flashing, the LEHLE DUAL EXPRESSION has selected the correct polarity automatically.
- Connect the 10K socket to the foot-switch input of your amplifier.
- Move the rocker of the LEHLE DUAL EXPRESSION. In the position the LEHLE DUAL EXPRESSION triggers the relay (usually in the toe position), the channel of your amplifier is being switched.
- There you go!
DEVICE CONNECTION
| EXP socket effects pedal | |
| Amplifier footswitch input |
How to do this as a latching switch:
- At the LEHLE DUAL EXPRESSION the LEDs of RTS and TRS should be both on. This way the Polarity Autodetection is active. In order to use the switching function of the 10K socket, its function must be activated. Hit the 10K button (6), until the LED is on blue steadily,
- Connect the 50K socket to the expression pedal input socket of your multi effects pedal.
- After the LEDs of RTS and TRS now have started and stopped flashing, the LEHLE DUAL EXPRESSION has selected the correct polarity automatically.
- Connect the 10K socket to the foot-switch input of your amplifier.
- Move the rocker of the LEHLE DUAL EXPRESSION. In the position the LEHLE DUAL EXPRESSION triggers the relay (usually in the toe position), the channel of your amplifier is being switched. The relay stays on until you reach this position again.
- There you go!
If your effects pedal doesn‘t react properly:
- Try the other output socket (2 or 3) of the LEHLE DUAL EXPRESSION.
- Depending on which output socket you are using (2 or 3), toggle the 10K button (6) or the 50K button (7) to change the polarity manually.
with a Synthesizer#

DEVICE CONNECTION
| EXP socket synthesizer | |
| EXP socket synthesizer |
Keyboards, synthesizers and master keyboards often have expression pedal inputs. With the LEHLE DUAL EXPRESSION you can control parameters such as volume, effects amount, pitch, filter, and so on. The possibilities are almost endless.
HOW TO DO THIS:
- At the LEHLE DUAL EXPRESSION the LEDs of RTS and TRS should be both on. This way the Polarity Autodetection is active.
- Connect the 50K or 10K socket to the expression input of your keyboard instrument.
- After the LEDs of RTS and TRS now have started and stopped flashing, the LEHLE DUAL EXPRESSION has selected the correct polarity automatically.
- Move the rocker of the LEHLE DUAL EXPRESSION.
- There you go!
for regulating the control voltage (CV)#

DEVICE CONNECTION
| CV module (LFO, ENV, etc.) and receiver for CV (VCA, OSC) |
Control Voltage (CV) is used to control parameters of modular synthesizers. From pitch to wild filter rides – what can be patched can be controlled. You can manipulate the CV with the LEHLE DUAL EXPRESSION, too.
You need a cable which has a TRS jack at one side and two TS jacks on the other. The two TS have to be either 6.3 mm or 3.5 mm, depending on the socket size of your modular synthesizer system.
HOW TO DO THIS:
- At the LEHLE DUAL EXPRESSION the LEDs of RTS and TRS should be both on. This way the Polarity Autodetection is active.
- Connect the TRS jack to either the 50K or 10K socket of the LEHLE DUAL EXPRESSION pedal.
- One of the TS jacks needs to be connected to the module generating the CV.
- Patch the remaining TS jack to the module which should receive the CV.
- After the LEDs of RTS and TRS have started and stopped flashing, the LEHLE DUAL EXPRESSION has selected the correct polarity automatically and move the rocker of the LEHLE DUAL EXPRESSION.
- There you go!
Attention: The LEHLE DUAL EXPRESSION can process voltages of max. 10 V.
Please refer to the manual of your effects pedal to find out how much voltage your pedal provides.
as MIDI-USB-Expressionpedal#

DEVICE CONNECTION
| USB socket computer |
These days making music with a computer is very common. The LEHLE DUAL EXPRESSION offers the possibility to send MIDI data via the USB socket to control software on your computer. E.g. you can control effects or volume in your digital amplifier simulation or manipulate the filter of your synthesizer in your DAW. Basically, you can control everything which receives MIDI and control changes (cc).
HOW TO DO THIS:
- Connect your LEHLE DUAL EXPRESSION to your computer via USB cable.
- Your computer should recognize the LEHLE DUAL EXPRESSION as external USB controller.
- Open the application which shall receive MIDI data.
- Follow the instructions of your application and define which parameter the LEHLE DUAL EXPRESSION should control. The LEHLE DUAL EXPRESSION sends the control change command 11 on MIDI channel 1 by default.
- There you go!
You can set the MIDI channel, CC controller, as well as min and max values in the LEHLE VERWALTER.
User Flow Maps#
Calibration of the Pedal Range and Switch Output#

Restoring the Factory Setting#

Fuctional Diagram#
